

From stay-at-home mommy to...*poof!* overly-excited-80's-styled-PFB-cooler-carrying-career-woman!
First question, where did my eyebrows go in that "mommy" picture? Dumb questions aside, are you ready to go back in time with me? How about the 1980’s? Ready to ride the wild culinary ride of a Foodie House reinvention? Think above and beyond a chef salad with French dressing served alongside a Tab with a straw. Think era appropriate fine dining, shook up, re-configured and formulated into a fabulous (and possibly “rad”) lunch, fit for any corner office with a view. Think Beef Wellington, raspberry vinaigrette, white chocolate and a fruity spritzer. Make you cringe? It should. But I’m going to change your mind with this menu fit for any lunch, 1980’s or not.

The lunch...

...in the bag.

(Shhh. I found the plates and cool drink bottle for 98 cents each at Target and the napkin is a bandana I got at the craft store for $1.98. The piece of hot pink ribbon was free- just found it laying around the house.)
I’ve been wanting to do a throw-back type post for a while, but nothing seemed to fit the bill until now. What could be more fun than reinventing some classic dishes and flavors, transforming myself into a stylish career woman and making it all (well, the food anyway) portable? It wasn’t until I got knee-deep in preparation for this post that I realized how much work this was going to be. I was in desperate need of a pep talk. So I popped in Working Girl and got myself re-focused. (Que Carly Simon's Let The River Run and goosebumps)
One of my Top Five Fav 80's movies!

Menu

Beef Wellington Sandwich - Seared Filet of Beef, Duxelles Mayonnaise, Roasted Sweet Pepper and Alfalfa Sprouts on a Croissant

Asparagus Salad with Fresh Raspberry Vinaigrette Topped with Feta Cheese and Crumbled Bacon

Day Glo Chocolate Cake with White Chocolate Cream and Neon Buttercream Frosting

Pom Spritzer with Fresh Mint

Delicate.
I’ve always been intrigued by Beef Wellington. I mean, it’s mysterious. Beef wrapped up in flaky pastry? No wonder it was so popular. Translating the flavors of a traditional Beef Wellington into a sandwich, had to have three main factors: the beef, which is the tender, low-in-fat filet, a flavorful paste that goes on the outside of the beef (some made with liver and others with mushrooms- I prefer the mushroom version) and the flaky pastry. So I used the same cut of beef, seared it to a medium-rare temperature, made a duxelles (mushroom paste) and mixed it with mayonnaise for a flavorful spread on the sandwich and a croissant to play the roll of flaky pastry. From there, I added a couple of my personal favorite sandwich toppings: roasted sweet pepper and alfalfa sprouts.


Beef Wellington Sandwich
3-4 oz. seared filet of beef, thinly sliced
2-3 pieces of roasted red, yellow or orange sweet bell pepper
2 tbsp. duxelles mayo (recipe below)
1 handful of alfalfa sprouts
1 croissant
Assemble sandwich to your liking, but I put mayo on both sides of the croissant, meat, pepper then alfalfa sprouts. Wrap in parchment to keep the sandwich from falling apart. Fit into a small cake box.


Duxelles Mayo
Duxelles is loosely adapted from Tyler Florence's Ultimate Beef Wellington Recipe
8 oz. cremini mushrooms (or whatever you like)
1 shallot
1 clove garlic
2-3 sprigs fresh thyme, using leaves only
1 tbsp. butter
1 tbsp. olive oil
1/2 c. mayo
salt and pepper
In a food processor, place all ingredients, except for butter, mayo and olive oil. Blend until the ingredients are almost to a paste consistency. In a pan over med-low heat, add butter and olive oil. Add mushroom mixture. Cook until all the water has evaporated and the mushrooms are brown and fragrant, about 10-15 min. Cool and then mix with mayo. Season with salt and pepper to taste. Chill.

Salad consumption is a blast!

Okay, we have to have a salad to go with this sandwich. Giant salads, as well as their partner in crime- raspberry vinaigrette, were plastered on every good restaurant's menu across America in the Eighties. For the Asparagus Salad, I wanted to do a couple of things: make a fresher version of raspberry vinaigrette, not use iceberg lettuce and switch out blue cheese from the Cobb salad with feta cheese and keep the bacon. As I read up on recipes for the raspberry vinaigrette, I couldn’t find one that used fresh raspberries- all of them called for raspberry infused vinegar. So I came up with my own version, which turned out pulpy and a vibrant red. Delicious!

Fresh Raspberry Vinaigrette
1 handful fresh raspberries
2 tbsp. red wine vinegar
1/2 tsp. sugar
1/2 tsp. Dijon mustard
5 tbsp. olive oil
salt and pepper
Mash raspberries with fork. Add the rest of the ingredients. Whisk together. Stir before dressing salad.

Asparagus Salad
1 lb. fresh asparagus, blanched, chilled and cut into 1" pieces
1/4 c. feta cheese
1-2 slices bacon, cooked and crumbled
4-5 tbsp. Fresh raspberry vinaigrette
salt and pepper
Mix asparagus with dressing and salt and pepper to taste. Top with feta and bacon. Toss before serving.

While some keep Jack in their desk, others keep cake.
Do you remember how many “Death by Chocolate” type cakes there were in the Eighties? Do you remember how white chocolate snuck into every known dessert and covered every Christmas-time treat in it’s waxy, faux-vanilla flavored coating? I remember ice cream shops and frozen yogurt places all having some form of white chocolate mousse flavor or white chocolate macadamia nut combo on their list of treats.


It's obvious that the cake is horrible.
I personally really dislike white chocolate. It’s too sweet for my taste, but for this challenge, I put it in a context that my palate would receive it willingly. I made dark chocolate the star and white chocolate the supporting actor. I used one of my favorite recipes for chocolate cake, sliced the cake in half, filled it with a white chocolate pastry cream and topped it with neon buttercream frosting for a special Eighties flair. I must say, I was surprised by how yummy the white chocolate pastry cream turned out. Let’s just say, that that bowl was pretty clean by the time I took the spatula to it.
The frosting? Well, what would any Eighties inspired dessert be without something neon? It's a nostalgic reminder of every windbreaker, t-shirt, scrunchie and pair of jelly shoes I ever owned. It's Eighties fashion in a pastry bag.

Day Glo Chocolate Cake with White Chocolate Cream
For the chocolate cake:
Divvies Chocolate Cupcake Recipe
I've adapted it to work as a cake
Oven: 350 degrees
makes 1 8x8 cake
1 1/2 cups cake flour (not self-rising)
3/4 cup sugar
1/4 cup cocoa powder
1 teaspoon baking soda
1/2 teaspoon salt
5 tablespoons vegetable oil
1 tablespoon white vinegar
1 teaspoon pure vanilla extract
1 1/4 cups water
Preheat oven to 350 degrees. Line a 8x8 pan with parchment and spray with pan release; set aside.
In a medium bowl, whisk together flour, sugar, cocoa powder, baking soda, and salt; set aside.
In the bowl of an electric mixer fitted with the paddle attachment, mix together oil, vinegar, vanilla, and water until well combined. Add flour mixture to the mixer and mix until smooth, scraping down the sides of the bowl with a spatula as necessary. Batter should look and feel more watery than normal cake batters.
Pour batter into prepared cake pan. Transfer to oven and bake, rotating pan halfway through cooking, until a cake tester inserted into the center comes out clean, 37-39 minutes.
Let cake cook 10 minutes then transfer to wire rack to cool completely.
White Chocolate Pastry Cream
an Allrecipes.com recipe
6 egg yolks
5 tablespoons white sugar
1/4 cup cornstarch
2 cups milk
1 vanilla bean, halved
2 tablespoons butter
3 ounces white chocolate
Directions
In a medium bowl, whisk egg yolks and sugar until pale yellow. Whisk in corn starch. Set aside.
In a stainless steel saucepan, bring milk and vanilla bean to a boil, remove from heat and remove vanilla bean. Stir a small amount of the hot milk into the egg yolk mixture. Return milk to heat and while constantly stirring with a wooden spoon, slowly add the egg mixture to milk. Mixture will thicken.
Allow to just come to a boil, remove from heat and stir in butter. Put mixture through a sieve into a bowl and cover with plastic wrap (this keeps mixture from forming a skin over top). Cool slightly.
Stir in melted white chocolate, cover and refrigerate until ready to assemble cake.

Day Glo Frosting
this is a halved buttercream recipe from allrecipes.com
1/2 cup butter (no substitutes), softened
4 cups confectioners' sugar
1 teaspoons vanilla extract
1/4 cup milk
Directions
In a mixing bowl, cream butter. Beat in sugar and vanilla. Add milk until frosting reaches desired consistency.
Divide the frosting into as many colors as you want to make. Add your food coloring. McCormick brand makes neon food coloring. That's what I used. The pink and green. 7-10 drops of each. Just play around and make what you like.

And finally, the spritzer. Basically, I'm thinking a non-alcoholic, better version of the wildly popular Bartle and James wine coolers. Now, if this was not a workplace meal, we would just go ahead and make it a real wine spritzer, but in keeping with company policy, no alcohol permitted.

She's far away from the office...
Pom Wonderful had sent me a case of their pomegranate juice, which I happily received. This was the perfect time to make a sassy little drink out of it. The club soda offered the “spritzer” element while the fresh orange juice and shredded mint mingled deliciously with the tart and tangy pomegranate juice. Top everything off with an umbrella, and you’ve got yourself a refreshing and borderline cheesy drink. We are, afterall, talkin’ about the Eighties.
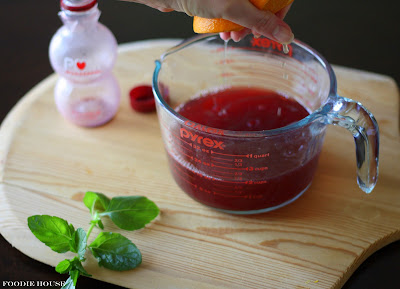

Pom Spritzer
8oz. Pom Wonderful
8 oz. club soda
juice of half an orange
5-6 fresh mint leaves, torn
umbrella and orange slice for garnish
loopy-loop straw (just for kicks)

A Behind the Scenes Look
Oh Friends, I started making the food on Wednesday and didn't finish until late morning on Friday. For normal, non-blogging, non-mom people this would not take that long, but in between child rearing and the endless photography sessions with nearly every step of every food process, it was taking a long time. The plan was to have all the food done by Friday at naptime, so I could transform myself and take photos while the kids slept. Oh naptime, what would I do without you? As soon as the last bedroom door was closed, I ran to plug in curling irons and break out the unused makeup that lingers at the bottom of my makeup bag. Hairspray? Check. Fine-tooth comb? Check. Really ugly red lipstick? Definitely.
I curled, sprayed and teased my hair. I assembled my wardrobe like a white chocolate tornado, attempting to stuff maxi pads in the shoulders of my husband's suit jacket and just as quickly tossing them out when they wouldn't stay. I applied my makeup, concentrating on severe blush and bright red lipstick and dashed to the specified photographing areas. Then I realized, I need a broom.
I've learned, with my new DSLR, quite a bit about the timer and how to use it properly. I use it only when I have no one to photograph me, of course. But it's not just as easy as, push-the-button-and-run-in-front-of-the-camera-and-pose-before-it-takes-the-picture. No, you must have a stand-in, so that the camera can properly focus. Otherwise, what happens (and has happened to me a hundred times and I've got hundreds of lame photos to show for it) is that you will be out of focus while the background is perfectly in focus. What I would give for a mannequin. Seriously, I would love to have one; even a dress form would work. What did I use? A broom. Not quite tall enough and very unreliable, especially when "standing" is one of the major requirements of being a stand-in. A broom turned on its handle loses its balance quickly. A broom slowly slides down the wall that you are trying not to focus on. A broom is annoying to get out of the picture once you don't need it anymore.

Pushing the stand-in out of the way.... really awkward pose.

My other wonky stand-in.
For the office scenes, an even more unruly stand-in was used- my son's play shopping cart topped off with the PFB cooler for my head. It worked great as far as focusing goes, but when it came to moving it out of the way to make room for myself, well, let's just say it was less than graceful and quiet (remember, this is during naptime, as pretty much anything is that I do for myself, so quiet is important.) I found it hard to remove the stand-in, gently set it on the floor, grab whatever food item I was supposed to be eating and pose. Some photos completely missed the mark.

Nice view of the shirt cuff, but where's my head?

I have nothing to say about this one.
When I think about some of the things I have done in the name of this blog, it just makes me smile. I enjoy every step of it. Sometimes I get overwhelmed, mainly because my ideas tend to waver on the grandiose-side of things, but that’s just how I work and I can’t seem to find satisfaction in anything less. I know I can push myself to do more, tap into areas that are unusual, bring a fun, alternative view to food and cooking. I always want the food to have a story. I think that is what makes the post entertaining for you, my readers.
I honestly am so thrilled to be in this sixth round. Thank you so much judges and voters for keeping me in the contest. I know I keep saying how much fun I’m having, but it’s true. I want you to know how much I have grown, week by week, challenge by challenge in this craft. It has built-up my confidence, expanded my brain (which is always good) and widened the creative outlet, which is this blog. So thank you, thank you, thank you!

Always re-apply your lipstick after a delicious, portable meal.
Love ya, Foodies!
P.s. I will send out a reminder post for voting, tomorrow!


