Sunday, October 24, 2010

PFB Challenge #6: Work It, Girl!

From stay-at-home mommy to...*poof!* overly-excited-80's-styled-PFB-cooler-carrying-career-woman!

First question, where did my eyebrows go in that "mommy" picture? Dumb questions aside, are you ready to go back in time with me? How about the 1980’s? Ready to ride the wild culinary ride of a Foodie House reinvention? Think above and beyond a chef salad with French dressing served alongside a Tab with a straw. Think era appropriate fine dining, shook up, re-configured and formulated into a fabulous (and possibly “rad”) lunch, fit for any corner office with a view. Think Beef Wellington, raspberry vinaigrette, white chocolate and a fruity spritzer. Make you cringe? It should. But I’m going to change your mind with this menu fit for any lunch, 1980’s or not.


The lunch...


...in the bag.

Challenge #6 for Project Food Blog is entitled Road Trip. The guidelines were to create a meal consisting of an entrée, side, dessert and drink that all has to fit into the cooler that they provided. Things like plates and cups did not have to fit- phew.

(Shhh. I found the plates and cool drink bottle for 98 cents each at Target and the napkin is a bandana I got at the craft store for $1.98. The piece of hot pink ribbon was free- just found it laying around the house.)

I’ve been wanting to do a throw-back type post for a while, but nothing seemed to fit the bill until now. What could be more fun than reinventing some classic dishes and flavors, transforming myself into a stylish career woman and making it all (well, the food anyway) portable? It wasn’t until I got knee-deep in preparation for this post that I realized how much work this was going to be. I was in desperate need of a pep talk. So I popped in Working Girl and got myself re-focused. (Que Carly Simon's Let The River Run and goosebumps)

One of my Top Five Fav 80's movies!


Menu

Beef Wellington Sandwich - Seared Filet of Beef, Duxelles Mayonnaise, Roasted Sweet Pepper and Alfalfa Sprouts on a Croissant

Asparagus Salad with Fresh Raspberry Vinaigrette Topped with Feta Cheese and Crumbled Bacon
Day Glo Chocolate Cake with White Chocolate Cream and Neon Buttercream Frosting

Pom Spritzer with Fresh Mint

Delicate.

I’ve always been intrigued by Beef Wellington. I mean, it’s mysterious. Beef wrapped up in flaky pastry? No wonder it was so popular. Translating the flavors of a traditional Beef Wellington into a sandwich, had to have three main factors: the beef, which is the tender, low-in-fat filet, a flavorful paste that goes on the outside of the beef (some made with liver and others with mushrooms- I prefer the mushroom version) and the flaky pastry. So I used the same cut of beef, seared it to a medium-rare temperature, made a duxelles (mushroom paste) and mixed it with mayonnaise for a flavorful spread on the sandwich and a croissant to play the roll of flaky pastry. From there, I added a couple of my personal favorite sandwich toppings: roasted sweet pepper and alfalfa sprouts.

Beef Wellington Sandwich

3-4 oz. seared filet of beef, thinly sliced
2-3 pieces of roasted red, yellow or orange sweet bell pepper
2 tbsp. duxelles mayo (recipe below)
1 handful of alfalfa sprouts
1 croissant

Assemble sandwich to your liking, but I put mayo on both sides of the croissant, meat, pepper then alfalfa sprouts. Wrap in parchment to keep the sandwich from falling apart. Fit into a small cake box.


Duxelles Mayo
Duxelles is loosely adapted from Tyler Florence's Ultimate Beef Wellington Recipe

8 oz. cremini mushrooms (or whatever you like)
1 shallot
1 clove garlic
2-3 sprigs fresh thyme, using leaves only
1 tbsp. butter
1 tbsp. olive oil
1/2 c. mayo
salt and pepper

In a food processor, place all ingredients, except for butter, mayo and olive oil. Blend until the ingredients are almost to a paste consistency. In a pan over med-low heat, add butter and olive oil. Add mushroom mixture. Cook until all the water has evaporated and the mushrooms are brown and fragrant, about 10-15 min. Cool and then mix with mayo. Season with salt and pepper to taste. Chill.

Salad consumption is a blast!


Okay, we have to have a salad to go with this sandwich. Giant salads, as well as their partner in crime- raspberry vinaigrette, were plastered on every good restaurant's menu across America in the Eighties. For the Asparagus Salad, I wanted to do a couple of things: make a fresher version of raspberry vinaigrette, not use iceberg lettuce and switch out blue cheese from the Cobb salad with feta cheese and keep the bacon. As I read up on recipes for the raspberry vinaigrette, I couldn’t find one that used fresh raspberries- all of them called for raspberry infused vinegar. So I came up with my own version, which turned out pulpy and a vibrant red. Delicious!


Fresh Raspberry Vinaigrette

1 handful fresh raspberries
2 tbsp. red wine vinegar
1/2 tsp. sugar
1/2 tsp. Dijon mustard
5 tbsp. olive oil
salt and pepper

Mash raspberries with fork. Add the rest of the ingredients. Whisk together. Stir before dressing salad.


Asparagus Salad

1 lb. fresh asparagus, blanched, chilled and cut into 1" pieces
1/4 c. feta cheese
1-2 slices bacon, cooked and crumbled
4-5 tbsp. Fresh raspberry vinaigrette
salt and pepper

Mix asparagus with dressing and salt and pepper to taste. Top with feta and bacon. Toss before serving.


While some keep Jack in their desk, others keep cake.

Do you remember how many “Death by Chocolate” type cakes there were in the Eighties? Do you remember how white chocolate snuck into every known dessert and covered every Christmas-time treat in it’s waxy, faux-vanilla flavored coating? I remember ice cream shops and frozen yogurt places all having some form of white chocolate mousse flavor or white chocolate macadamia nut combo on their list of treats.


It's obvious that the cake is horrible.

I personally really dislike white chocolate. It’s too sweet for my taste, but for this challenge, I put it in a context that my palate would receive it willingly. I made dark chocolate the star and white chocolate the supporting actor. I used one of my favorite recipes for chocolate cake, sliced the cake in half, filled it with a white chocolate pastry cream and topped it with neon buttercream frosting for a special Eighties flair. I must say, I was surprised by how yummy the white chocolate pastry cream turned out. Let’s just say, that that bowl was pretty clean by the time I took the spatula to it.

The frosting? Well, what would any Eighties inspired dessert be without something neon? It's a nostalgic reminder of every windbreaker, t-shirt, scrunchie and pair of jelly shoes I ever owned. It's Eighties fashion in a pastry bag.


Day Glo Chocolate Cake with White Chocolate Cream

For the chocolate cake:
Divvies Chocolate Cupcake Recipe
I've adapted it to work as a cake

Oven: 350 degrees
makes 1 8x8 cake

1 1/2 cups cake flour (not self-rising)

3/4 cup sugar

1/4 cup cocoa powder

1 teaspoon baking soda

1/2 teaspoon salt

5 tablespoons vegetable oil

1 tablespoon white vinegar

1 teaspoon pure vanilla extract

1 1/4 cups water

Preheat oven to 350 degrees. Line a 8x8 pan with parchment and spray with pan release; set aside.

In a medium bowl, whisk together flour, sugar, cocoa powder, baking soda, and salt; set aside.

In the bowl of an electric mixer fitted with the paddle attachment, mix together oil, vinegar, vanilla, and water until well combined. Add flour mixture to the mixer and mix until smooth, scraping down the sides of the bowl with a spatula as necessary. Batter should look and feel more watery than normal cake batters.

Pour batter into prepared cake pan. Transfer to oven and bake, rotating pan halfway through cooking, until a cake tester inserted into the center comes out clean, 37-39 minutes.

Let cake cook 10 minutes then transfer to wire rack to cool completely.

White Chocolate Pastry Cream
an Allrecipes.com recipe

6 egg yolks
 5 tablespoons white sugar
 1/4 cup cornstarch
 2 cups milk
 1 vanilla bean, halved
 2 tablespoons butter
 3 ounces white chocolate

Directions

In a medium bowl, whisk egg yolks and sugar until pale yellow. Whisk in corn starch. Set aside.

In a stainless steel saucepan, bring milk and vanilla bean to a boil, remove from heat and remove vanilla bean. Stir a small amount of the hot milk into the egg yolk mixture. Return milk to heat and while constantly stirring with a wooden spoon, slowly add the egg mixture to milk. Mixture will thicken.

Allow to just come to a boil, remove from heat and stir in butter. Put mixture through a sieve into a bowl and cover with plastic wrap (this keeps mixture from forming a skin over top). Cool slightly.

Stir in melted white chocolate, cover and refrigerate until ready to assemble cake.
 

Day Glo Frosting
this is a halved buttercream recipe from allrecipes.com
 
1/2 cup butter (no substitutes), softened
 4 cups confectioners' sugar
 1 teaspoons vanilla extract
1/4 cup milk
Directions

In a mixing bowl, cream butter. Beat in sugar and vanilla. Add milk until frosting reaches desired consistency.

Divide the frosting into as many colors as you want to make. Add your food coloring. McCormick brand makes neon food coloring. That's what I used. The pink and green. 7-10 drops of each. Just play around and make what you like.


And finally, the spritzer. Basically, I'm thinking a non-alcoholic, better version of the wildly popular Bartle and James wine coolers. Now, if this was not a workplace meal, we would just go ahead and make it a real wine spritzer, but in keeping with company policy, no alcohol permitted.

She's far away from the office...

Pom Wonderful had sent me a case of their pomegranate juice, which I happily received. This was the perfect time to make a sassy little drink out of it. The club soda offered the “spritzer” element while the fresh orange juice and shredded mint mingled deliciously with the tart and tangy pomegranate juice. Top everything off with an umbrella, and you’ve got yourself a refreshing and borderline cheesy drink. We are, afterall, talkin’ about the Eighties.
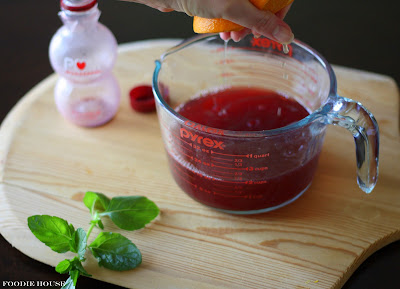

Pom Spritzer

8oz. Pom Wonderful
8 oz. club soda
juice of half an orange
5-6 fresh mint leaves, torn
umbrella and orange slice for garnish
loopy-loop straw (just for kicks)


Mix all ingredients together, pour into travel container. Pour over ice at destination and garnish.

A Behind the Scenes Look

Oh Friends, I started making the food on Wednesday and didn't finish until late morning on Friday. For normal, non-blogging, non-mom people this would not take that long, but in between child rearing and the endless photography sessions with nearly every step of every food process, it was taking a long time. The plan was to have all the food done by Friday at naptime, so I could transform myself and take photos while the kids slept. Oh naptime, what would I do without you? As soon as the last bedroom door was closed, I ran to plug in curling irons and break out the unused makeup that lingers at the bottom of my makeup bag. Hairspray? Check. Fine-tooth comb? Check. Really ugly red lipstick? Definitely.

I curled, sprayed and teased my hair. I assembled my wardrobe like a white chocolate tornado, attempting to stuff maxi pads in the shoulders of my husband's suit jacket and just as quickly tossing them out when they wouldn't stay. I applied my makeup, concentrating on severe blush and bright red lipstick and dashed to the specified photographing areas. Then I realized, I need a broom.

I've learned, with my new DSLR, quite a bit about the timer and how to use it properly. I use it only when I have no one to photograph me, of course. But it's not just as easy as, push-the-button-and-run-in-front-of-the-camera-and-pose-before-it-takes-the-picture. No, you must have a stand-in, so that the camera can properly focus. Otherwise, what happens (and has happened to me a hundred times and I've got hundreds of lame photos to show for it) is that you will be out of focus while the background is perfectly in focus. What I would give for a mannequin. Seriously, I would love to have one; even a dress form would work. What did I use? A broom. Not quite tall enough and very unreliable, especially when "standing" is one of the major requirements of being a stand-in. A broom turned on its handle loses its balance quickly. A broom slowly slides down the wall that you are trying not to focus on. A broom is annoying to get out of the picture once you don't need it anymore.

Pushing the stand-in out of the way.... really awkward pose.

My other wonky stand-in.

For the office scenes, an even more unruly stand-in was used- my son's play shopping cart topped off with the PFB cooler for my head. It worked great as far as focusing goes, but when it came to moving it out of the way to make room for myself, well, let's just say it was less than graceful and quiet (remember, this is during naptime, as pretty much anything is that I do for myself, so quiet is important.) I found it hard to remove the stand-in, gently set it on the floor, grab whatever food item I was supposed to be eating and pose. Some photos completely missed the mark.

Nice view of the shirt cuff, but where's my head?

The amount of photos taken to get one good one would have to be 20 to 1. The entire 2 hour naptime was filled to the brim with failed photo attempts, drooping hair and a brain thinking, “what am I going to make for dinner?”

I have nothing to say about this one.

When I think about some of the things I have done in the name of this blog, it just makes me smile. I enjoy every step of it. Sometimes I get overwhelmed, mainly because my ideas tend to waver on the grandiose-side of things, but that’s just how I work and I can’t seem to find satisfaction in anything less. I know I can push myself to do more, tap into areas that are unusual, bring a fun, alternative view to food and cooking. I always want the food to have a story. I think that is what makes the post entertaining for you, my readers.

I honestly am so thrilled to be in this sixth round. Thank you so much judges and voters for keeping me in the contest. I know I keep saying how much fun I’m having, but it’s true. I want you to know how much I have grown, week by week, challenge by challenge in this craft. It has built-up my confidence, expanded my brain (which is always good) and widened the creative outlet, which is this blog. So thank you, thank you, thank you!
Always re-apply your lipstick after a delicious, portable meal.

Love ya, Foodies!

P.s. I will send out a reminder post for voting, tomorrow!


Monday, October 18, 2010

Pumpkins, Shmumpkins and Voting!

Tiny with his baby pumpkin.

On Saturday we went to the pumpkin patch nearby our house. Though it is cooler than full-blast summer weather here in Houston, it's still hot when you are standing in the sun and your forehead feels like a hot plate. The Hubs claimed he could fry an egg on his "balding" spot. It's nowhere near the fall I remember growing up in Kansas City. But I remained optimistic about capturing precious moments of Tiny's first pumpkin picking and Bubba and Boo's enthusiastic chirping over which pumpkins to get.

Well...let's just say, it was nowhere near the romantic picture I had painted in my mind.

Weighed down like a pack-horse of all things baby/toddler and memory capturing devices, I waddled up to the front of the church with my brood and Hubs, where the pumpkin patch was set up. As we get closer, we see a young girl on her knees retching into the soft, well-maintained grass below her. Her mother, in her smart, designer clothes, looked concerned and confused as just what to do. The Hubs and I looked at one another, not as in "aww, poor kid" but more as in "great, now our kids are going to get a virus." Horrible isn't it? When you become a parent, this is what you think. So my visions of frolicking through rows of pumpkins was now slimed with the vomit of a sick child.


I was murmuring something about how we were going to wash there hands with rubbing alcohol before we leave and then we see the pumpkins. Even now, at thirty-three years of age, I still get excited by large quantities of pumpkins. Pallets and pallets of large, happy orange orbs. I immediately get out the camera and start clicking away.

Surrounding the patch, faux-patch really, were tents of different attractions- more like distractions. I wanted my kids to focus on the pumpkins so I could capture all I wanted to capture, because it was, afterall, all about me.

One of the many distractions, foiling my plans for portait quality pictures.

To the left, a sweet grey-haired woman was trying to lure my children into her tent with Bible stories. To the right was a sno-cone stand and a huge swingset diverting their attention. Then there was an even bigger tent with music and then...the bounce house. Oh God. I hate bounce houses. Why? Because my two oldest will beg and beg to go in. You take off their sock and shoes (any parent of a toddler knows how ANNOYING putting socks an shoes on is), they get in there for two seconds, get bumped into by a child who has no business being in there with their 5 foot-tall body and come back out bawling. We steered clear of the bounce house and distracted them with baby pumpkins and face painting.

Yup, that's about as good as it gets.

No one wanted their picture taken. The distractions were far to...distracting. Everyone refused to look directly at the camera, or if they did, their face was facing me but their eyes were on the sno-cone machine. I got a couple of Tiny with his pumpkin, but it was short-lived as the pumpkin pallets, made great bumper pads for 15 month-old children who were still wobbly in their walking abilities.


The best part, and I think the kids would agree, was the face-painting. Amazing how having a cool, wet paintbrush dance across your cheek can calm hyper 3 year-old children. They sat like zombies as the super sweet teenage girls completed their requests for a football for Bubba and a butterfly for Boo.

So my lovely friends, it's time to cast your vote! If you enjoyed my Reuben Saga-ish entry, please click on the link below. You have sent me half-way through this competition, why not send me through to the next round? I keep telling you how much I enjoy this, because it's true. I am learning so much, stepping outside my comfort zone and creating things I've never dreamed. My writing is getting better as are my photos, because of this contest. So THANK YOU!


Love ya, Foodies!

Sunday, October 17, 2010

PFB Challenge #5: She Put A Reuben On It


All she could hear was the rubbery “squeak” of her knife sawing its way down the face of the cabbage. The house was perfectly quiet, as each of her three children were napping, and she was seizing this time to bring to life her newest inspired idea. Her thoughts ranged from I should write my next post in third person, to I'm nervous about this hair-brained idea. It was a momentary worry; her thoughts soon drifted back to the sheer delight of a quiet house and her knife back to the cabbage, shaving angel-hair thin strips.

Mid-way through slicing, her hand started to cramp. She laid down her less-than-sharp knife and firmly rubbed the inside of her thumb. She stretched out her long fingers, trying to find some relief. For a moment, she realized how much her hands had aged and then shrugged it off. She quickly moved on to photographing the cabbage on the cutting board. She left it just as it was. No fussing, she whispered and pulled her hands back from the haystack of feathery cabbage. It didn’t need a bit of direction.

Stray shreds of the freshly-cut cabbage were haphazardly strewn across the kitchen floor. She never claimed to be tidy cook, as she felt cleaning-up as she went, broke the creative flow of her culinary process- she simply had no time for it. As she carried handfuls of ingredients back and forth between the counters, the orphaned cabbage threads stuck to the heels of her feet, causing her to stop and shake her foot. It irritated her immensely but not enough to cause her to stop what she was doing.

She measured out the vinegar, sugar, salt and pepper for the cabbage brine. She poured the ingredients into the glass Pyrex measurer and heated it for almost three minutes. She lunged at the microwave just before it started beeping and opened the door quickly. She wanted the house to stay quiet. She did not want to disturb the sleeping babes.


Immediately the vapors of the hot vinegar hit her nostrils and she started to cough and swat at the air. When would she ever learn? She stirred the steamy liquid –face turned away- until all the sugar was dissolved.

She scooped up all the cabbage threads and plunged them down into the slightly-cooled brine. She was quickly reminded that she had a paper cut on her right ring finger. She squealed and yanked her hand out quickly. She continued working the cabbage down into the brine with her left hand, while sucking the vinegary mixture off of her injured ring finger. The brine was perfectly tangy, sweet and salty.


She referred to her idea journal momentarily to reconnect with her inspiration. It was a simple, not overly-complicated idea. She wanted to keep the flavors clean and familiar while transporting it to the mouth via the mandated vehicle of the challenge- pizza. Her idea to forgo the classic sauerkraut that she loved and adored and replace it with a brighter, what she felt, more updated version was making her nervous. But what continually brought her back to trust in her inspiration was the contrast of the cold pickled cabbage atop the hot, salty, cheesy toppings of the Reuben pizza. She was deeply hoping it would work.


She liked to sketch out her ideas in scrawly drawings and scribbled words. She cherished each and every idea, regardless of whether it ever came into being. Cooking, to her, was just as artful as her paintings or collages. Its conception on paper was chiefly important, for she knew, if she did not write or draw her idea down, it would be lost forever in the scattered, cranial filing cabinets of her mommy-brain. The drawings helped her to remember the inspiration clearly and not miss a detail- for she loved details.


She stepped outside to retrieve the bowl containing the pizza dough she crafted earlier. It was a perfect 80 degrees outside and a gentle breeze played with the stray hairs around her face. She brushed them away with the back of her forearm and picked up the bowl from its warm place on the porch. She cradled it in her arms as she walked back inside. As she lifted the towel to behold the magic of yeast, flour, salt and water; she once again found herself amazed. She never tired of being surprised by what laid under that towel. There before her was the once tiny dough ball, peppered with anise seeds, now doubled in-size and pungently fragrant. She sighed with content and then happily punched down the dough. This was her favorite part of bread making. The dough collapsed all around her fist. It was, as they say, as soft as a baby’s bottom, which she- as an experienced mom- knew the feeling of, all too well.


She let the dough rest. Meanwhile she photographed ingredients, over and over in different light and different configurations. She was enjoying the moody lighting of the afternoon sun lazily drifting through the dining room windows. It was doing the job of conveying the autumnal feelings that she had as she made the pizza- the knowing that darker evenings and cooler weather was soon to be upon her.

She came back and lightly floured the countertop and spread it around leaving swirling marks with her fingertips. She cut the dough in four equal pieces and took one portion. She laid it down on the cold granite and started rolling it out. It occurred to her that keeping it a long oblong shape would be appealing and different. Why must a pizza be round? She thought.

Her oven was blasted hot and prepared with two inexpensive terra cotta tiles on the bottom rack of her oven. She was very proud of her $1.98 purchase from the local home improvement store. They worked like a dream making every pizza she made crispy and evenly baked.


On her pizza peel she scattered a bit more flour to ease the un-baked pizza into the oven. She started the process of building the pizza. On top of the thinly-rolled pizza dough went her homemade Thousand Island dressing. She liberally smeared it on with the back of a spoon and retrieving spillage with her forefinger. She tasted it. It was creamy, sweet and tangy. A piece of pickle relish crunched between her back molars.

Next she layered on the Baby Swiss cheese. It was already getting oily and wilted from the heat radiating from the oven. It draped itself onto the bed of dressing like a satin sheet. Atop the cheese she artfully arranged, pieces of corned beef, which were cut into ½” strips. They reminded her of ribbons at Christmastime.

She popped it into the oven, more with awkward movements and biting of her lip than quick finesse. She didn’t really care how it got in there, just as long as it did and without major damage. She shut the door and breathed relief.

She turned the oven light on because, like a kid, she would press her face up to the glass and watch the cheese bubble and spit as it got closer and closer to being done. The edges on the corned beef started to crisp and curl. This excited her greatly.


Ten minutes went by and she announced it was officially done- to nobody. The crispy bottom of the crust slid onto the peel with the help of a fork. She quickly ran it over to the dining room table for its photography session. It was beautiful. She grabbed some of the pickled cabbage, remembering to use her left hand, and squeezed it well. Switching hands, she sprinkled with her right hand and pressed the button on her camera with the left. She loved capturing the action of a meal being composed.


As she photographed the slices on a plate, she grabbed a beer. A few sips of beer with un-dainty bites of the freshly-baked pizza was her version of afternoon delight. She continually had to remind herself that this was time to get great shots, not a grazing session. She did both.


The pizza far exceeded her expectations. It was as she hoped it would be, but so much more satisfying. The crispness of the crust supported the soft cheese and dressing as it enveloped the saltiness of the corned beef. The crescendo at the end of every bite was the pickled cabbage that crunched and popped with vinegar-y vigor. She was pleased that her vision of two childhood favorites merging to create a new adulthood favorite had come into fruition...that and she got to drink a beer at three o'clock in the afternoon, for photography purposes only. ("she" winks)


Reuben Pizza

makes 4 personal size pizzas

3/4 lb. corned beef, sliced very thinly and then into 1/2" strips
1/2 lb. baby Swiss cheese, sliced very thinly
2 tbsp. chopped fresh parsley (for garnish)
1 recipe homemade Thousand Island dressing (see below)
1 recipe pizza dough (see below)
1 recipe quick pickled cabbage (see below)

Place unglazed terra cotta tiles (or pizza stone) in a cold oven. Preheat to 500 degrees. Cut dough into fourths and roll out one at a time. Sprinkle pizza peel with flour and place thinly rolled dough on top. Layer dressing, cheese then corned beef. Bake for 10 minutes until edges are brown and cheese is bubbly and hot. Remove and have a handful of squeezed pickled cabbage ready to top the pizza. Cut and enjoy! Preferably with an ice cold beer.


Homemade Thousand Island Dressing

1 cup mayo
1 cup pickle relish
1/2 cup ketchup

Mix and set aside.


Pizza Dough
(Click HERE for my how-to video)
Prep time: 10 minutes plus 45 minutes to rise, plus 15 minutes to rest

2 c. flour
2 tsp. sugar
1 tsp. salt
3 tbs. olive oil
2 tsp. instant yeast
1/2 c. warm water (110 degrees)
(only for the Reuben Pizza: add 1 1/2 tsp. anise, fennel or caraway seeds that have been dry-roasted in a pan until fragrant)

Dump all ingredients into your stand mixer with dough hook attachment, turn to medium speed. If the dough looks a little dry, add a tsp. water. If it looks wet, add a bit of flour.

When it pulls together in a ball, that is when you start the timer for the 5 minutes of kneading. Just let the mixer do the job for you. You can also do this by hand.

After the five minutes, you should have a soft, elastic dough and in most cases the bowl will be "clean" as in all the dough pulled away from the sides.

Pour in a tsp. of olive oil into your bowl. Coat the dough ball in the oil, this prevents it from drying out.

Cover the bowl with a dish towel and set in a warm place to rise until doubled in size, about 45 minutes.


Quick Pickled Cabbage

2 cups white vinegar
1 cup sugar
2 tbsp. salt
2 tsp. fresh cracked pepper
2 cups cool water
1 cup ice cubes
1 small head of cabbage, very thinly sliced

Heat vinegar, sugar, salt and pepper in a glass bowl, in the microwave for 3 minutes. Stir to dissolve all the sugar. Add the shredded cabbage and water. Massage the cabbage into the brine. Add ice cubes and let stand for at least an hour.


This was my version of a twist on the recipe for pizza, which all the contestants for Project Food Blog were required to do for this Challenge #5. Pizza is one of my top favorite foods, and it's made weekly in our house. The Reuben is a sandwich that I loved as a child, which my mom would make on Sunday afternoons after church, usually in the fall. It's the marriage of two classic comfort foods into one thoughtfully planned and crafted new creation. I mean it when I say, I wish you could taste the photos.

I seriously hope you can feel how grateful I am to have made it to this round! I would be lying if I didn't say I was shaking in my boots on Friday to find out if I made it. It's been sheer delight, with a few minor moments of pure frustration, and tons of learning! So thank you again and again and again!

Voting begins 6AM Pacific Time October 18th and goes through 6PM Pacific Time October 21st. Don't worry, you know I will remind you.

Love ya, Foodies!

Friday, October 15, 2010

A Bunch of Tidbits

Most adorable sous chef, ever.

You know I am loving this Project Food Blog thing. It has been very challenging and inspiring. It's been time-consuming and at times, ridiculous. But I really, really love it. We will see if I  move on to the next round this afternoon.

I guess, I just wanted to take a moment and express my gratitude to everyone that has stopped by Foodie House recently. The PFB has generated much more exposure for little 'ol me in the past few weeks. I've gained more readers and found some new favorite blogs in the process. I wanted to share some of those new favorites with you and basically give you a big, fat, juicy kiss via this post, for all your support and love. So MWUUUUAHHHHH! There, you've been "kissed".

Some of my new favs are: (these are not all, just a taste.)

Jenn at Much to My Delight- freakin' hilarious is mostly what I have to say. Crafting, cooking and just all-round artsy-cool. That and I think she's my sister from another mister.

Susi at Susi's Kochen Und Backen Adventures- Susi just rocks. This woman can cook and bake like nobody's business. Her photos are incredible and everything she does just reeks excellence.

Michelle at Jelly Shot Test Kitchen- Oh my gosh! If you want to see some beautiful, incredibly creative drinks, scoot on over to see Michelle at JSTK. The photos are amazing and her drink combinations are so cool and classy. Not to mention, that they are all jello-shots. Bottoms up!

Let's see, other news and reports...I've got a guest post on Sticks Forks Fingers today!! Pam is off in New Zealand with her Hubby for their honeymoon and asked me and Jason from Ancient Fire Wine Blog to do some guest posts. I was so excited! It's my very first one, and if you would like to get some history on the Hubs and I, well, do come over to Pam's for a wine review and an engagement story, complete with pictures of Yours Truly, eleven years ago. I also do my best to do a "wine review" with the Hubs. It was challenging.

What else? Oh! I keep meaning to mention that I am on Twitter. I continually try and get that little "Follow Me" Twitter birdy on my blog, but Blogger refuses to let me have it. SO, I am just telling you. My username is "foodiehouse". So add me to your following and I will do the favor in return! I am still trying to figure Twitter out. I see many of my friends on there doing all this fancy RT and # stuff and I am overwhelmed. I've been visiting the "Help Center" trying to help myself. If you have any tips, I would be very grateful to hear what you have to say.

Washing machine update: Okay, so yesterday morning the delivery guy shows up on time and with my new washer. (if you didn't read my last post, my washer was on the total fritz and flooded my laundry room!) Anyways, he sets it up and checks it. Seems to be fine. I go to do my first load of a now GINORMOUS pile of laundry and half-way through I start smelling a burnt rubber smell. (The delivery guy is, of course, now long gone.)

You know when you get a new blender or some sort of appliance and it gives off that burnt plastic smell? Like that but 100 times worse. I threw the windows open and turned on the fan. I was bracing myself for the smoke alarm to go off. I couldn't see smoke, but the smell was so strong. A headache and an irritated call to customer service later, I 've got a new washer coming to me on Saturday. Thank God I bought the kids some new underwear at Target yesterday. You know your laundry is backed up when your Hubs has nothing to wear to work but a mock turtleneck and a jock strap and your doing dishes in a formal gown and a nursing bra.

Okay, Foodies. I think that catches us up. Whether I do or don't move on to the next round of PFB, I will show you my twist on pizza. It turned out pretty yummy. I'm excited to share it with you.

Love ya!

Monday, October 11, 2010

Voting and A Load of...Laundry.

See Alice there? Yep, that's pretty much what my laundry room looked like, minus the mouse.

I've been wrestling with my crazy washer this morning. I've got a laundry pile the size of Mount Doom, looming in my closet. Adding to that, my washer gets off kilter and about every 5 minutes; it sounds like there's a giant playing dodgeball in my laundry room. I rush in there and try to quiet him with cookies...or petit fours.

Okay, in the middle of writing this post, I go in to once again, hush the "giant" and there before me, is what looks like what a giant's pee would look like if he peed in my laundry room. The laundry room is flooded!!! There is 1/2" of water all over. Now doubly irritated that I have to clean-up this mess AND petit fours will not help me now (told you they were hellish), I grab some towels and get to work. I open the garage door, that is connected to the laundry room and there is a river of water running out and under unused strollers and old high-chairs. My collection of hats continues to grow. Mommy, blogger, maid, counselor, nurse, cook and now janitor.

The only good thing about this event is that I'm going to get a new washer. And maybe some votes?

Today is the start of voting for Project Food Blog!!  Aren't you pumped? I'm excited. It's down to 100 contestants now.

So if you haven't checked out my entry for Picture Perfect challenge #4, you can click here and vote. If you are not signed-up with Foodbuzz.com, it's super easy and a great community to be apart of. If you are, well, whatcha' waitin' for?

CLICK HERE TO VOTE!

Thank you so much for helping me get this far! I'm having so much fun!!!
Love ya, Foodies!
Related Posts Plugin for WordPress, Blogger...